Monday, May 25, 2009

25 May 09: My 1st Fondant attempt


Lifeng forwarded me this site@ http://www.mongstirs.com/ and everything there seems so interesting lor.... so I signed up for a Fondant modeling workshop. Too bad, Lifeng's colleague already took leave for tat day so she is not able to join this workshop :(

The class is fun... only 4 person in a class. Fees is only @ $100 including tools, a packet of wilton fondant & 6 pre-prepared cupcakes.

We learnt 6 pretty looking figurines: crown, baby booties, bee, car, handbag & elmo... fun fun fun :D

1st we start off making a crown... but I was too engrossed and forgot to take picture... then we make the baby booties....
  • Roll out 2 white balls of the same size
  • Use a dog-bone tool to dig a hole in each ball
  • Pipe ribbon on the booties using tip no.3
  • Decorate with golden ball-ball
Here's the "Chanel" handbag :D
  • Roll out Fondant to about 1/2cm thick
  • Press quited plastic moulding sheet on the rolled-out fondant using rolling pin
  • Cut out 2 "rectangles" - 1 for front of bag, 1 for back.
  • Roll out another fondant sheet of about 2mm thick (for the bag flap)
  • Roll out a tiny stripe for the handle
  • "Glue" all bits and pieces together using water :D
  • Decorate with golden ball-ball

Buzz buzz Beezzz....
  • Roll out 1 yellow ball - to shape of a giant tick-tac
  • 1 long black stripe for the body stripe
  • 1 short black strip for the sting
  • 1 "m" shape white fondant
  • roll the black strip on the yellow oval-ball, using water to stick
  • white "m" shape fondant for the wings
  • use edible marker to dot the eyes
  • use any rounded cutter to shape the bee's smiling mouth
  • dig a hole at the back of the bee and place in the sting

Sport Car

  • roll out 1 blue fondant ball, shape into a oval shape
  • 1 smaller tube-shape as spoiler
  • 4 black balls as wheels
  • 1 white ball as the driver

Mong recommend the "Shinny brand" stamping set... can use to stamp any alphabets on fondant :) but please.... its meant for fondant work only... do not use as its original purpose :D


Elmo

  • 1 round red ball as head
  • 1 oval ball as body
  • 2 tubes for hands
  • 2 tubes for legs
  • 2 white balls as eyes
  • 2 black balls as eye-balls
  • 1 orange ball as nose

Saturday, May 9, 2009

07 May 09: Strawberry Basket bouquet for my MUM


It's Mother's Day on coming Sunday...
My mum told me recently.... Korean strawberry tastes best!... although it's towards orangy in color, and looks as if its not ripe yet, it tastes sweet... compared to the USA lah, Egypt lah, Australia lah.... blah blah... all so sour :(
Was at Shop&Save on Wednesday and there were a few punnets of Korean strawberries on the fridge shelves... so I bought 2... maybe I should bake a strawberry cake for mum... Present + Cake... 2-in-1 :D so cheapo!! :))
So again... my same pattern, I bake a 6-inches sponge cake... cut into 3 half-inches thick slices.
I layered the sponge cake with strawberry mousse, stuffed with lots of halved-strawberries. Then I position the top layer with whole strawberries, then I brushed them with apricot gel... so they look shinny-shinny :D The sides r lined with finger sponge (ladyfinger... used for tiramisu) and to prevent them from falling off the cake, I tied a ribbon around the cake, which makes it look like a present :D
Result not bad hor?
I delivered the cake to my mum, who stays with my brother now... I think mum is happy and gave me 2 mangoes in exchange?!?? Make no sense :P
Brother saw the cake ands say I PRO leh!! Me Very happy of coz!! :">


Then, as usual, lots of left-over of cake, strawberry and cream... so I made these for my gals! And they LOVE it! and I'm glad :)

Friday, May 8, 2009

06 May 09 : Checkerboard Cake

I always wonder how to create those checker boxes inside cakes....

Last week, I borrowed "Cakes Galore" by Valerie Barrett from Yishun Library and there is this Pink and White Cake which Nyx said its so beautiful. Its actually a checkerboard cake which was what I wanted to do... so I started my experiment (again :D)

I made 2 6-inches round sponge cakes, 1 strawberry and 1 vanilla.

  • Cut the cake into slices of about 1/2 inches thick for each slice
  • Use cookie cutters in 2 different sizes to cut out rings of cake from the slices
  • Assemble to cake with alternate colours.

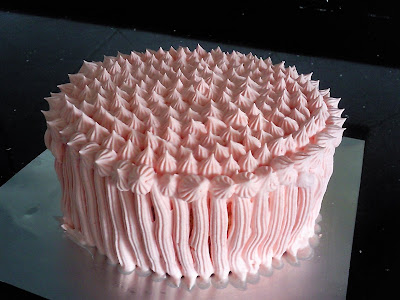
I tried to imitate the decoration of the cake on the book but my piping skill is still very limited... so this is the outcome :P Evelyn suggested to change the icing colour to green and it'll look like durian :D I will do that for my durian cake.... soooon... :D

This is quite easy to make... but hor, I was too lazy to spread some icing in-between the cake slices to secure the cake... little cube of checkers actually fall off when i cut it... anyway, its ok as all got to go inside my tummy after all :P

LinkWithin

Related Posts with Thumbnails